GENE
TOOLS

SNPCheck V4
SNPCheck is a tool for performing checks for the presence of SNPs in predicted PCR primer binding sites.
SNPCheck 3 Documentation
As well as the written documentation below, screencasts are available, which are a quick way to get an explanation of the tool in action:
 Quick Overview
Exploring Filter Settings
These screencasts include descriptions of features that are currently disabled.
SNPCheck allows primers designed for use in the polymerase chain reaction (PCR) to be checked for single nucleotide polymorphisms (SNPs) in predicted primer binding regions. The tool works by first searching for the primer sequences in the human reference genome (this is done using BLAST - the Basic Local Alignment Search Tool). Having identified the most likely binding sites, a search is performed for SNPs in those sites. The tool searches against data from the latest build of dbSNP. The results are presented in the form of a tabular summary and diagrams for each pair of primers entered.
Single primer pairs can be checked directly from the home page of SNPCheck 3.
SNPcheck is now operated by EMQN and Certus Technology. Account logins and checking multiple primers are currently disabled pending a system redesign - expected later in 2019.
SNPcheck is now operated by EMQN and Certus Technology. Account logins and checking multiple primers are currently disabled pending a system redesign - expected later in 2019.
Subscriptions to SNPCheck 3 are currently disabled, pending a system redesign - expected later in 2019.
Registrations to SNPCheck 3 are currently disabled, pending a system redesign - expected later in 2019.
User Accounts are currently disabled, pending a system redesign - expected later in 2019.
User Accounts are currently disabled, pending a system redesign - expected later in 2019.
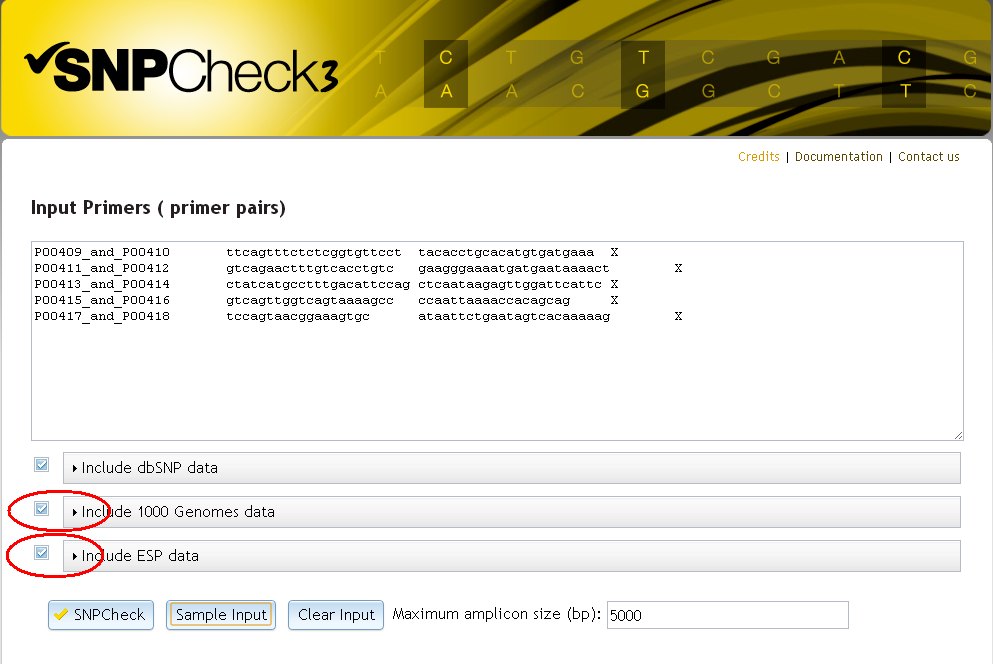
When logged on to SNPCheck 3 you are greeted by a page which looks like that shown in the figure below. You can enter primer pairs into the text box and click "SNPCheck" to submit them for checking.
.png)
Primer Input Screen
A simple tab-delimited format is used for primer pair input. Each primer pair should be on a new line, and each line should consist of a primer pair name (without spaces), primer sequence 1, primer sequence 2, and the chromosome where the primers are targeted to bind. Each of these should be separated by any number of spaces or tabs. Valid inputs look like:
	P00409_and_P00410	ttcagtttctctcggtgttcct	tacacctgcacatgtgatgaaa	 X
	P00411_and_P00412	gtcagaactttgtcacctgtc	gaagggaaaatgatgaataaaact	 X
	P00413_and_P00414	ctatcatgcctttgacattccag	ctcaataagagttggattcattc	 X
	P00415_and_P00416	gtcagttggtcagtaaaagcc	ccaattaaaaccacagcag	 X
	P00417_and_P00418	tccagtaacggaaagtgc	ataattctgaatagtcacaaaaag	 X
Note that if you store these details in a spreadsheet with the fields in this order you will be able to copy and paste directly from there.
Clicking "Sample Input" will automatically enter this same sample data to demonstrate the expected inputs. The tool is agnostic as to which is the forward or reverse primer so these can be entered in any order. The "Maximum Amplicon Size (bp)" field allows the maximum amplicon size to be altered from the default 5000bp for a given batch of checks. The tool will only predict pairs of binding sites which lead to an amplicon size less than the value specified here.
Valid inputs must:
- Not include duplicate primer pair names
- Include primer sequences which only consist of valid DNA nucleotide codes
- Include primer sequences of 12 or more base pairs in length
- Include a valid human chromosome identifier (1-22, X, Y) or the code MT for mitochondrial primers.
If there are errors in input then messages highlighting these errors will be shown (see below).
.png)
Errors in Primer Input
The orange text under the input text area describes any problems. On correction of the highlighted errors the user should click "SNPCheck" once more in order to submit the corrected primer pairs for checking.
This feature is currently disabled, pending a system redesign - expected later in 2019.
Access your primer area by clicking on the link in the top right hand corner of the screen.

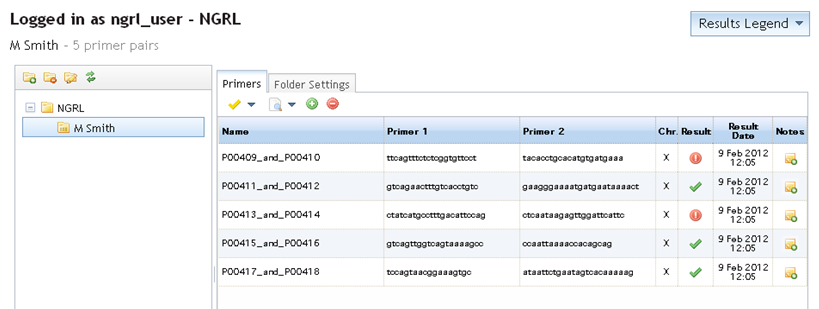
You will be directed to a page where you can manage your primers. This will look something like the screen below:
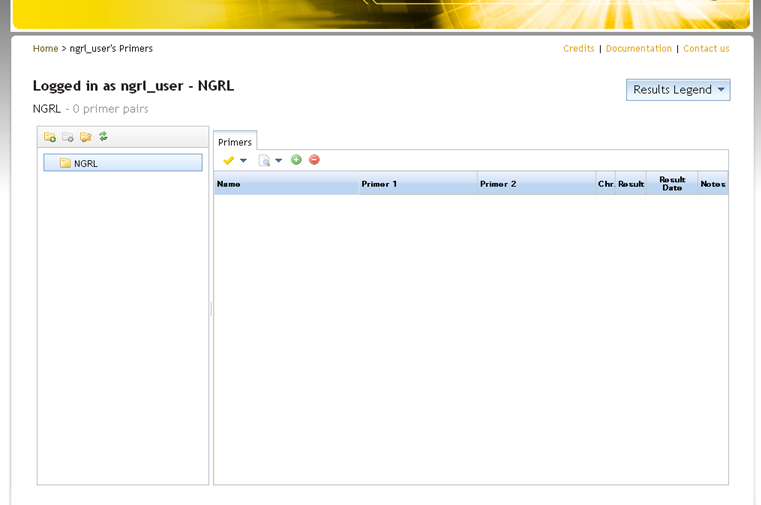
On the left-hand side of the main panel is a folder tree where folders can be created to organise stored primers (and SNPCheck results). Initially there will be a single empty folder (named after your laboratory). Typically you might add folders for particular people, genes or diseases, but each lab is free to organise their folder structure as they wish.
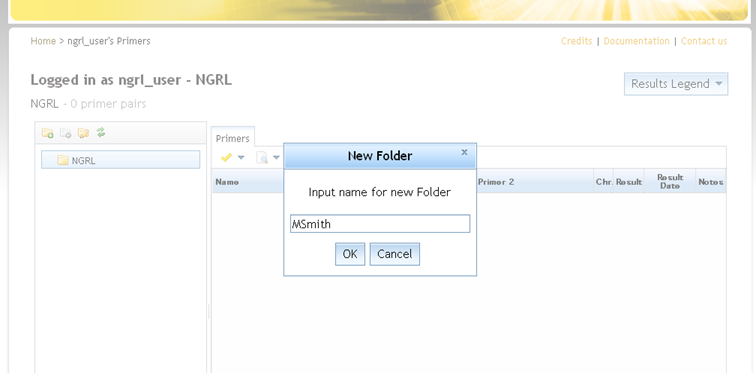
You can add a folder by first selecting the parent folder inside which you want the new folder to be created and then clicking
 at the top-left. This will prompt you to provide a name for the new folder (see screenshot below).
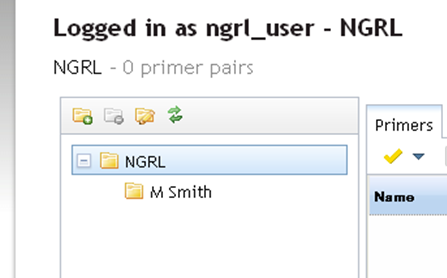
Once you enter a name and click OK the new folder will be created under the selected folder as shown below:
This feature is currently disabled, pending a system redesign - expected later in 2019.
There are two ways to save primers to a folder.
1. Saving directly to folder
Select a folder from your folder tree and add some new primer pairs to it by using the  icon in the Primers tab. You are prompted for your primer pairs as shown below. You should paste in your primer
pairs using the correct format: a set of lines for each primer pair containing [name] [primer 1] [primer 2]
[chromosome] (each separated by a space or tab). Primer pair names must not be repeated within the same folder.
There is also a limit of 500 primer pairs per folder.
icon in the Primers tab. You are prompted for your primer pairs as shown below. You should paste in your primer
pairs using the correct format: a set of lines for each primer pair containing [name] [primer 1] [primer 2]
[chromosome] (each separated by a space or tab). Primer pair names must not be repeated within the same folder.
There is also a limit of 500 primer pairs per folder.

When adding primer pairs in this way they will not be SNPChecked until you specifically request it (see section on SNPChecking saved primers).
2. Saving by SNPChecking
An alternative way to store results to a folder is to perform a check from the SNPCheck homepage. You will see a save icon  in the top-right of the results page -click on this and you will be shown a dialog asking you to choose a folder in which to save the results.
You can also add a new folder and save to that (the settings configured for the check will be associated with the new folder).
in the top-right of the results page -click on this and you will be shown a dialog asking you to choose a folder in which to save the results.
You can also add a new folder and save to that (the settings configured for the check will be associated with the new folder).

There are limits to what you can save to where:
- If you attempt to save results to a folder that already contains primer pairs with the same name then SNPCheck will not let you. If you wish to check primer pairs that have already been saved to a folder and update the results you should do so through the "user primers page."
- If you happen to add identical primer pairs with different names then these will be added to the folder as separate primer pairs.
- If you attempt to save results to a folder which has different folder settings than those used for the results in question then SNPCheck will stop you from doing so. If you want to use different settings then create another folder.
This feature is currently disabled, pending a system redesign - expected later in 2019.
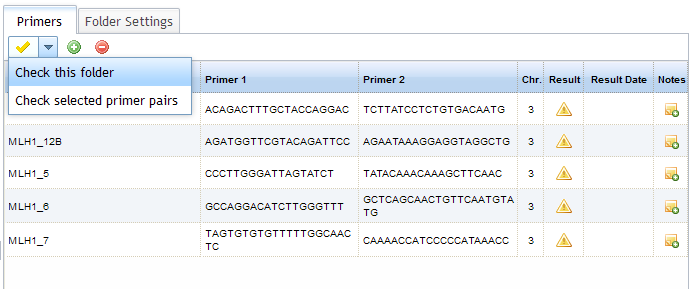
Select the folder that contains the primers you wish to check - you will see your primers in the primer panel to the right of the
folder tree. You can check all of the primers in the folder, or a selection of them (select by holding Ctrl while clicking on the
primers of interest). Click on the yellow tick icon  to open the Check options and choose to either check the whole folder, or selected primer pairs. When primer pairs have not been
checked (or an error has occurred during a check) the icon in the "Result" column appears as
to open the Check options and choose to either check the whole folder, or selected primer pairs. When primer pairs have not been
checked (or an error has occurred during a check) the icon in the "Result" column appears as  .
.
Whether you check all pairs in the folder or only selected ones from the list you will now see a save icon
appear at the top-right of your results (see below). If you click this icon then the results will be saved to the folder. If you do
not save them, then the folder will still appear as in the screenshot above when you return to it. The results will not be updated.
If you save your results, on returning to your "primers page," the folder contents will have been updated. The result column will now show the relevant icons depending on the latest saved result and the date of these checks will also be shown in the adjacent column (see below).
This feature is currently disabled, pending a system redesign - expected later in 2019.
To delete a primer pair, select the primer pair you wish to delete and click  on the menu bar above the primer panel.
To edit a primer pair, select the primer pair you want to edit and click  on the menu bar above the primer panel.
The quantity of data in dbSNP has grown rapidly over recent years. Moreover in certain gene regions there is now a high density of data that does not pertain to common polymorphisms. This is largely because, since Spring 2008, clinical submissions have been accepted into dbSNP. Most of the clinical submissions come in the form of data from locus-specific databases (LSDBs).
For applications like SNPCheck where the interest is only in common human variation this has begun to be problematic. Whilst dbSNP remains the most comprehensive source of SNP data, there are an increasing number of rare/deleterious variants mixed in, and there is no simple mechanism to distinguish these from true SNPs. In dbSNP the term "clinically associated" appears. This indicates that at least one submission to the reference SNP cluster is from a clinical source (usually an LSDB). However, it is frequently the case that the LSDB has adjudged the variant to be a polymorphism, so this "clinically associated" status does not help in distinguishing common variants from pathogenic ones.
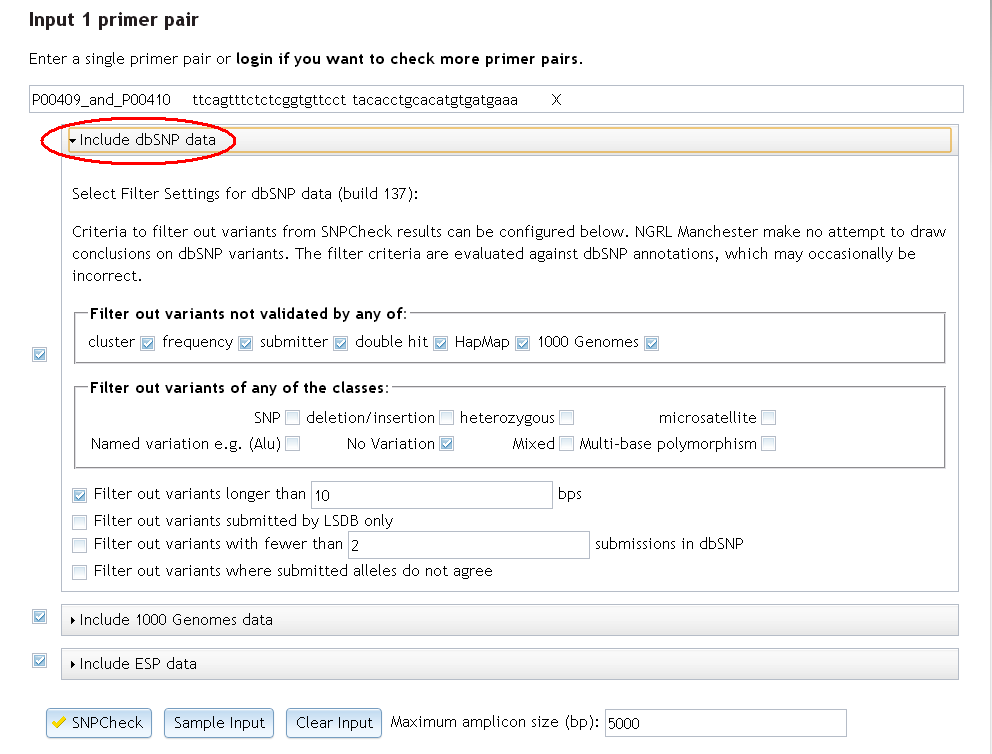
Some filtering options have therefore been introduced in SNPCheck. The aim of these is to allow you to filter out variants that are rare, have little supporting evidence or both. The filter options are found on the primer input page and in the Folder Settings tab of a primer folder.
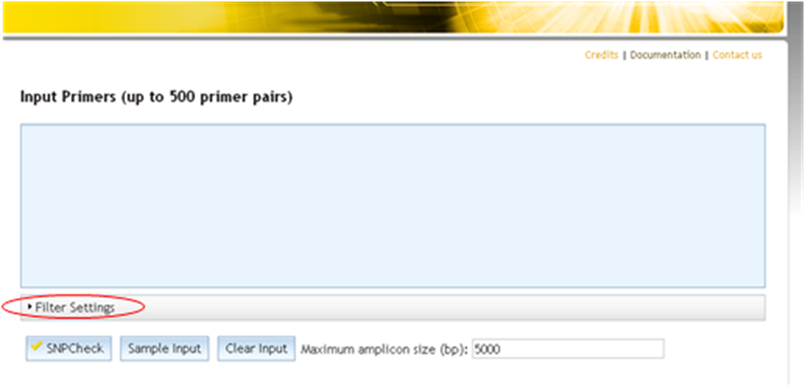
Accessing filter settings from home page
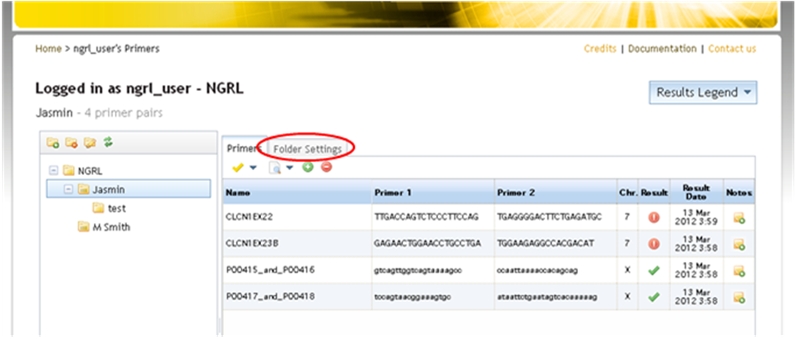
Accessing filter settings from primer folder
The graphic below shows the filter options. "Filtered out" variants will not be removed from the results but will be clearly differentiated from unfiltered variants.
.png)
Filter Options
You can choose to filter variants based upon their validation status. If a variant is validated by one or more of the methods selected then the variant will not be filtered. If all validation boxes are checked (as they are by default) then unvalidated SNPs will be filtered. The validation methods that can be used in filtering criteria are the same that can be seen on rs records on the dbSNP website, namely:
- cluster: Validated by multiple, independent submissions to the refSNP cluster
- frequency: Validated by frequency or genotype data: minor alleles observed in at least two chromosomes
- submitter: Validated by frequency or genotype data: minor alleles observed in at least two chromosomes
- double hit: All alleles have been observed in at least two chromosomes apiece
- HapMap: Genotyped by HapMap project
- 1000 Genomes: SNP has been sequenced in the 1000 Genomes project
You might also choose to filter variants of certain classes. Variants of any of the checked classes will be filtered. The classifications available for filtering are:
- SNP: a genuine single nucleotide polymorphism. Leave this unchecked if you are interested in SNPs.
- deletion/insertion: an insertion deletion polymorphism (also known as a DIP in dbSNP)
- heterozygous: a variation that has unknown sequence composition, but has been observed to be heterozygous
- microsatellite: microsatellite/simple sequence repeat
- Named Variation, e.g. (Alu)/-: allele sequences defined by name tag instead of raw sequence
- No Variation: submission reports invariant region in surveyed sequence. This box should remain checked as we are not interested in areas of no variation
- Mixed: the reference cluster contains submissions from multiple classes
- Multi-nucleotide Polymorphism: multiple nucleotide polymorphism (all alleles same length where length>1)
It is also possible to filter variants bigger than a specified size (in base pairs). If all variants not of class SNP are being filtered then this filter will have no further effect. Note that variants that do not start or end within 200 base pairs of the primer will not be picked up in the SNPCheck results anyway, so values larger than about 400 base pairs are also unlikely to have much effect.
You can also filter variants where the only submission is from an LSDB. If you are already filtering variants not validated by cluster (on its own), then this filter will have no effect as all clusters containing only a single submission will already be filtered.
There is also the option of filtering by minimum number of submissions (whether independent or not) to the reference SNP cluster. This is useful if you desire variants to have more than 2 submissions in the cluster. Otherwise using the "validation by cluster" filter is probably preferable.
Finally, an option exists to filter those variants where the submissions have no overlapping alleles. This can happen when a number of submissions have been clustered due to their proximity, but each one involves different alleles. This lack of agreement could be taken to indicate that any SNP that does exist at this position is rare and/or that the submissions are erroneous.
Use the filter settings as described in the previous section.
The SNPCheck 3 folder settings (maximum amplicon size to consider in the results, and SNP filtering rules) can be set on a per-folder basis. To access, click on the "Folder Settings" tab. When a folder is created and primers added the settings are always initialised to the SNPCheck defaults no matter what settings a user has previously used and no matter what the settings of parent folders are.
If you change the folder settings then saved results may no longer be relevant. Unless the settings used are exactly the same, previously saved results will not be displayed in the folder any more. Switching the settings back will retrieve them however.
If changing the settings you should click the "Save" button to ensure that the folder settings are stored. If you navigate away from this tab with unsaved changes you will be prompted to confirm whether to save them first or not. Navigating to another folder will permanently lose the altered settings if you do not save them.
Your saved SNPCheck results cannot be permanently saved - for this reason we recommend that you keep make separate records if you need to keep
a permanent record of a primer check. This can be done easily by either exporting to Excel, saving as a pdf, or printing the results, using the
icons above the results table 

 .
.
Saved results will be cleared from the system for a number of reasons:
- When SNPCheck is updated to a new build of dbSNP (this happens roughly once every six months).
- If a new build of the human reference genome is released.
- If other major updates are made to SNPCheck that might affect the results of a primer check.
- If folder settings are changed (as described in the previous section).
- Saved results are cleared out every two months (this rule helps us to prevent overloading of the storage space within SNPCheck and ensure the service runs smoothly).
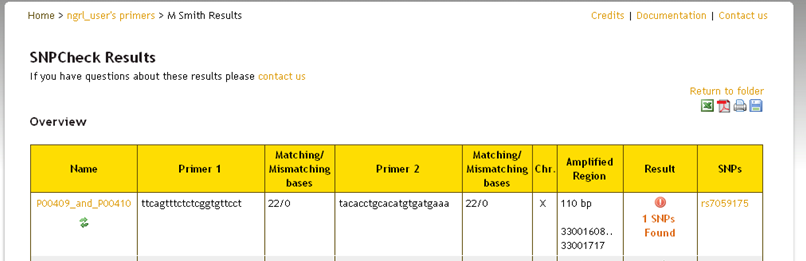
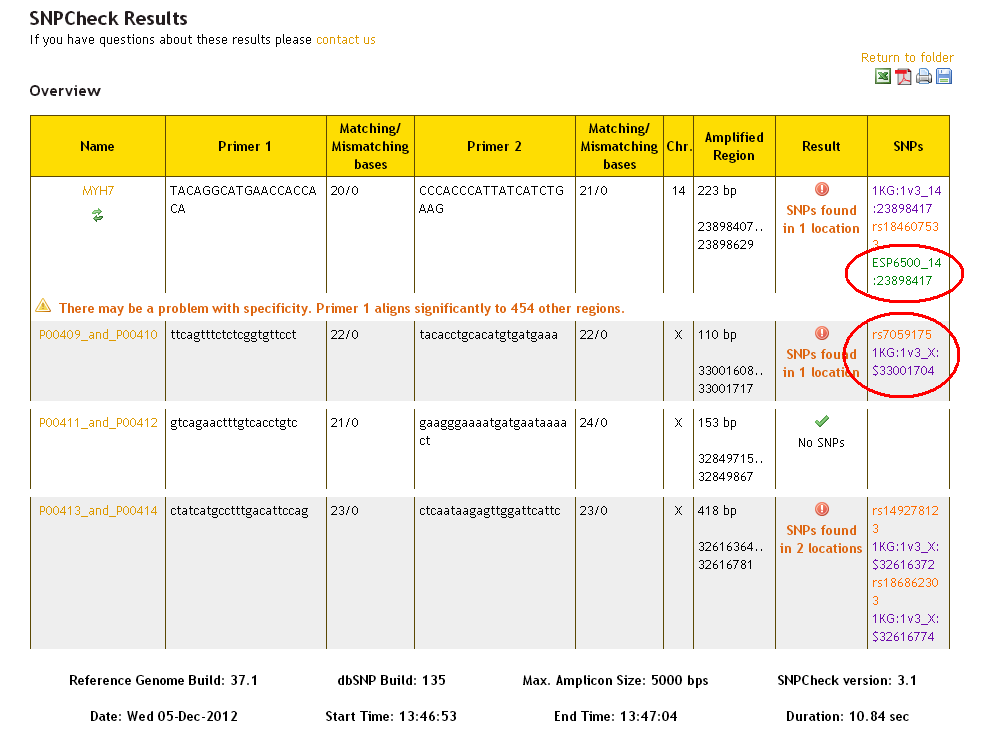
Once you have entered your primer pairs and clicked to SNPCheck them you will be presented with a page containing an overview of the SNPCheck results, as shown below. This table will be gradually populated with results as SNPCheck completes each check.
.png)
Results Overview
The primer pair names in the left hand column act as links to allow navigation to the detailed results for that particular primer pair. Each primer sequence is listed alongside the number of matches/mismatches in the alignment to the reference genome. This should always add up to the complete primer length as adjustments are made to account for the alignment tool returning truncated sections of the sequence. The size of the predicted amplicon and its position (in chromosome coordinates) are given in the "Amplified Region" column. A summary of the result is given in the Result column, and links out to the source database for any SNPs found are available in the final column.
Warnings will also be given regarding the alignments found for the specified primers, e.g. if they are imperfectly matched to the reference sequence (see below). If there are more than one 100% alignments or alignments with only 1bp difference then a warning will also be given. These warnings can be ignored provided the user is happy with the specificity of their primer and that SNPCheck has identified the expected binding regions. In the case that both primers align to the same strand, a warning will also be given, as primers for each strand are necessary for PCR. It is quite likely that the intended region has been identified, but by choice (or error) the user has entered both sequences in the same orientation. In this case, using the reverse complemented sequence for one of the primers will avoid the warning.
.png)
Results warnings
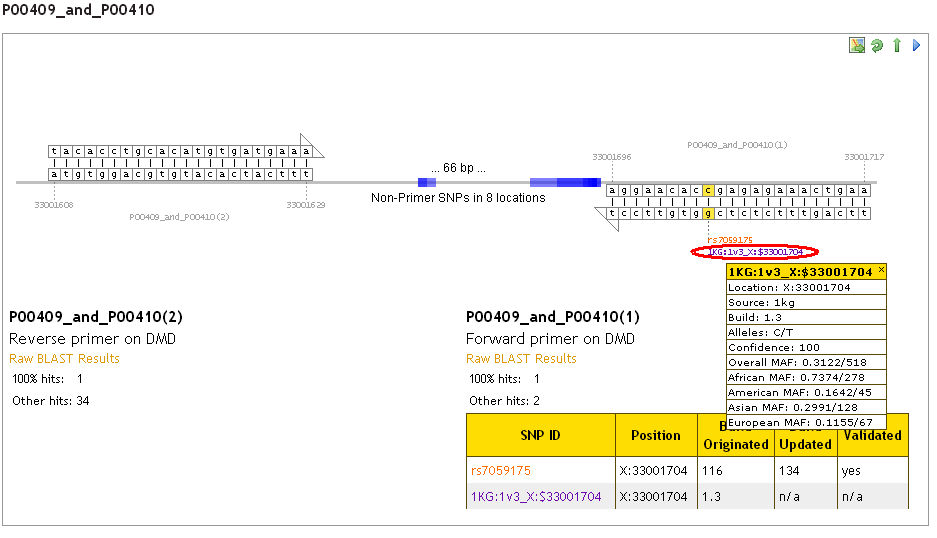
Further down the screen you can see detailed results for each primer pair, as shown below. A diagram shows the primers and the section of the reference sequence where it is predicted that they will bind. SNPs appear in an orange shade. More saturated oranges indicate where multiple SNPs exist. SNPs between the primers are shown in blue and, again, a more saturated blue indicates where SNPs overlap. Below the diagram will be a table of information for any SNPs found in primers.
If the tool is already aware of a valid result available for the primer pair you have input then this may be used rather than performing
the complete check again. In this case (or if there is an error in checking a primer pair) then a refresh button ![]() will appear below the primer name in the overview table. Clicking this will force the check to be performed.
will appear below the primer name in the overview table. Clicking this will force the check to be performed.
.png)
Detailed Results
There are two green icons to the top right of the diagrams. The "up" arrow can be clicked to navigate back to the overview table at the top. The circular arrow allows the image to be flipped 180 degrees. This is provided because the result is displayed in the orientation of the contig where the primers were located. If the gene in question is transcribed in the opposite direction then the result may be in the opposite orientation to the reference sequence the primers were designed from. It may therefore be convenient for the user to flip the image using this button.
Primer SNPs are marked in orange and labelled with their database-specific identifier (e.g. rs number). The amplified region between the primers is summarised by giving its size and the number of SNPs within it (this figure does not include the number of SNPs in the primers themselves). SNPs between the primers are indicated with a blue mark. It is also possible to view the full BLAST results using the links below the diagram.
If the primer is not 100% aligned to the reference sequence then this will be shown in the Match/Mismatch column of the overview. It will also be displayed in the detailed diagram, as shown below. The gap is indicated in the diagram by the absence of an alignment pipe and there being no box around the nucleotide in the reference sequence.
.png)
Primer with Gaps
The SNPs in the diagram can be clicked on to get a popup information box. This shows some information about the SNP, including the HGVS names generated by dbSNP, and provides links to the source database and other sites where information about the SNP can be viewed.
.png)
SNP popup information box
If the SNP has been validated then this will be shown in the popup, e.g. it might say "Validated by 4 methods". Clicking this will bring up a further popup listing each method of validation which applies to the SNP.
.png)
Validation status popup
Clicking one of the blue inter-primer SNPs will also produce a popup detailing the SNP in question. Because they are tightly packed in the image it may be difficult to distinguish between them. However, clicking on one of these SNPs, or on the "Non-Primer SNPs..." label, also reveals a table detailing all of these SNPs (see below). Clicking the small cross at the top right of the table allows it to be hidden again.
.png)
SNPs between primers
-
There may be a problem with specificity. Primer X aligns significantly to Y other regions:
This warning is given if there are multiple 100% alignments or alignments with only a single mismatch or gap. The "100% hits" figure can be used alongside this warning. Other "significant" alignments may lead to unexpected PCR products, with 100% hits being particularly problematic. This warning is given since the information is available to SNPCheck and might be of interest to the user. It might also indicate the possibility that the "incorrect" binding region is predicted by SNPCheck. However, the assumption is that the primers input into SNPCheck are already correctly designed. Remember that it is only an alignment to the specified chromosome that is performed. Matches to other regions in the genome will not be taken into account. The provision of this warning in SNPCheck should therefore not be used as a full test for primer specificity.
-
The primer sequences aligned to the same strand:
Forward and reverse primers in PCR are designed to anneal to opposite strands of template DNA. This warning is given if the input primers are found to align to the same strand. The user may have input sequences in this orientation purposefully. However, the warning is given because it may be an indicator that an unexpected binding site is being predicted by SNPCheck, or that the primers have been designed wrongly.
-
One or more primer alignment was imperfect:
This warning indicates that there were gaps in the alignment of the primers to the reference genome. Where possible SNPCheck will not predict binding sites with gaps as ideally the primer should match 100% to the genome. Mismatches between the primer and template DNA can adversely affect PCR. Multiple gaps are likely to be more problematic than single ones and the presence of other equally good or better binding sites in the genome will also affect how serious the effect of mismatches will be.
If filter options were set in the input screen then the user might find filtered variants in their results. In the overview table at the top, the number of filtered variants will be shown in the "Result" column, as shown below. In this case only some of the known variants have been filtered. Thus, the result still says "SNPs Found" and those SNPs not filtered out will be shown in the "SNPs" column. However, if all variants are filtered then the result will state "No SNPs Found"; no SNPs will appear in the SNPs column; but there will still be a note showing how many variants were filtered out.
.png)
Filtered SNPs in Overview
The detailed results will contain grey variants in the diagrams (See Figure 12), which are the ones that have been filtered out. Where the grey appears to be more saturated there are multiple filtered variants overlapping. Each of these variants will appear in a "Filtered SNPs" table for the relevant primer. The "Reason/s Filtered" column of this table indicates which criteria led to the variant in question being filtered out.
.png)
Filtered SNPs in Detail
In the case of the image above, the user has checked all boxes under "Not validated by any of:" in the input screen. Thus any unvalidated variants are being filtered out. The majority of filtered variants have been filtered out for this reason, with rs63749747 also being filtered out due to being bigger than 10bps.
The results page also has a summary of the filter settings used to put the results in their correct context (as do exported PDFs or Excel spreadsheets). The summary can be found under the results overview table and is preceded by the text "Binding region variants filtered out if matching any of the following criteria:".
If your laboratory has a SNPCheck 3 account, then you will be able to save results to a folder once logged in. However, these results cannot be stored permanently and so it is recommended that they are stored/exported separately if you require a permanent copy. This can be done whether or not you have a SNPCheck 3 account from the SNPCheck results page.
At the top right of the overview section are a set of controls:
These three buttons allow export to Excel, to PDF and printing. In all cases, much of the extraneous information contained in the webpage will be removed.
If you have SNPChecked a primer pair without logging in to SNPCheck 3 you will see a slightly different view. You will not be able to save your results to a folder, but will still be able to use the PDF, Excel and print functions. In addition, below the results overview table is a link to allow you to return later and retrieve results for the same primer set you have just checked. Following this link will lead to a page which will check whether there are any valid results already known and redisplay these, or alternatively perform the set of checks again. You can save this link to return to your results at a later time, although they will not be saved permanently.
Since dbSNP build 131, a large number of rare variants from the Breast Cancer Information Core (BIC) Database have been added to dbSNP. In order to help interpret these variants (many of which are not SNPs) it is now possible to view some extra information about them. In order to do so the user will require login details for the BIC database. A link will be provided below the SNP details to allow the user to login and view more information (See Figure 14).
.png)
Variant with BIC information available
The user only needs to login once per session after which the BIC information will be displayed automatically. The information that will be presented is the BIC interpretation of the variant, the number of entries in the BIC database, and the number of submissions in dbSNP. It is up to the user how to make use of this information. However, it is suggested that an interpretation of "clinically important" or the presence of only a single entry in either database is evidence that the variant is rare and/or deleterious. These facts therefore appear in a highlighted font. See below for an example. These variants (adjudged likely to be rare) appear the same grey colour as filtered variants in the diagrams.
.png)
Example BIC Information
The 1000 Genomes Project (www.1000genomes.org) has used next generation sequencing to characterize the genomes of a number of major world population groups. The goal of the project was to find most genetic variants that have frequencies of at least 1% in the populations studied. The project has provided a lot of data, which has supported the calculation of Minor Allele Frequencies (MAFs), which can be used to inform your primer design.
Reference
1000 Genomes Consortium (2010). A map of human genome variation from population-scale sequencing. Nature 467(7319):1061-73
1000 Genomes data are being released in phases. dbSNP already includes some 1000 Genomes data but the version used in SNPCheck - phase 1 version 3 - is more recent. Because dbSNP is rebuilt infrequently, we will be able to update the 1000 Genomes data set more rapidly as new versions and phases are released. We are also able to present more information about 1000 Genomes SNPs than dbSNP, such as population MAFs and confidence scores.
1. When checking primers from the home page
Select the 'Include 1000 Genomes data' or 'Include ESP data' options - you can check multiple datasets simultaneously, or select just one.
Filter settings for the dbSNP dataset can be accessed by clicking on the dbSNP bar:
2. When checking saved primers in a folder
Select the 'Folder Settings' tab and select the 'Include NGRL's 1000 Genomes (1KG) dataset' or 'Include NGRL's ESP dataset' option. Click 'Save' to save these settings.
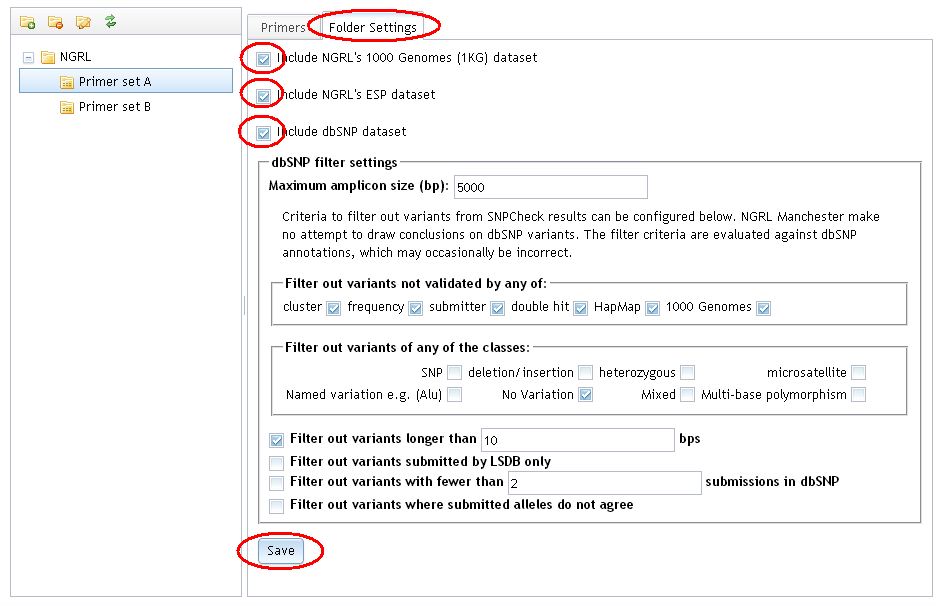
Filter settings are only available for the dbSNP dataset. This is because the settings are based on information about the validation of variants as annotated in dbSNP and there are no equivalent annotations in the 1000 Genomes or ESP datasets.
If SNPChecking against all datasets simultaneously, the results overview will look like this:
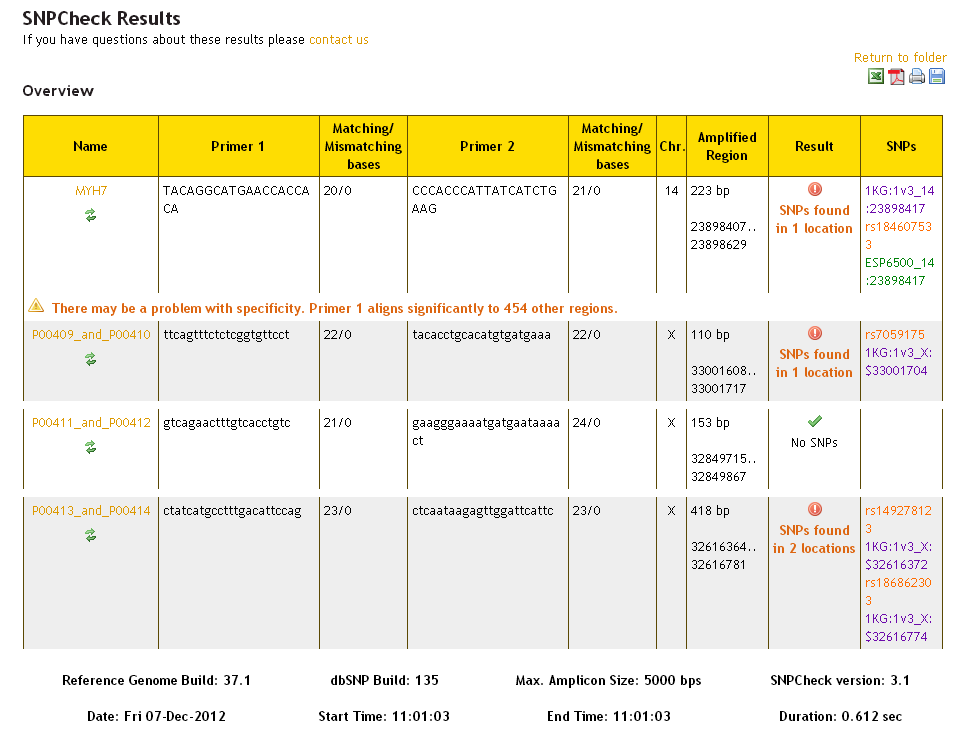
SNPs from the dbSNP dataset are presented in orange, and SNPs from the 1000 Genomes dataset are presented in purple and SNPs from the ESP dataset are presented in green. It is possible that the same SNP will be found in more than one dataset - this is represented by multiple separate SNPs being referenced in the 'SNPs' column, and the result reading: 'SNPs found in 1 location'.
In the detailed view (scroll down the results page), additional information about the SNP (including frequency data for 1KG and ESP SNPs) can be revealed by clicking on the SNP reference on the graphic:
It is not possible at present for us to provide a link directly to a SNP of interest in either the 1000 Genomes project or Exome Sequencing Project website or browser, due to the structure of these online resources. The SNP ID provided (e.g. 1KG:1v3_X:$33001704 or ESP6500_19:41920067) shows the SNP location, which can be used to find the variant in the 1000 Genomes browser (http://browser.1000genomes.org/index.html) or the ESP data browser (http://evs.gs.washington.edu/EVS/).
A typical 1000 Genomes SNP ID looks like this: 1KG:1v3_X:$33001704
This can be broken down into the following sections:
- 1KG = SNP is from the 1000 Genomes dataset
- 1v3 = SNP is from the phase 1 version 3 release
- X = X chromosome
- 33001704 = genomic coordinate of the variant
To search for this SNP you could enter X:33001704-X:33001705 into the search field in the 1000 Genomes Brower (http://browser.1000genomes.org/index.html).
ESP SNP IDs are constructed similarly and can be searched for in a similar way from the 'Data Browser' area of the ESP website: http://evs.gs.washington.edu/EVS/.
1000 Genomes data are released in phases and versions of each phase, rather than builds. 1000 Genomes SNP IDs tell you which phase and version each SNP has come from - see 'How do I use 1000 Genomes SNP IDs to find the variant location?' for more information. The 1000 Genomes information given for each SNP in the pop-up box gives a build number for the data: build 1.3 means phase 1 version 3. There is no available information the 1000 Genomes dataset about the first phase and version in which a SNP was first reported or updated in, as there is for dbSNP data.
The current ESP data release is called 'ESP6500SI' and is taken from 6503 samples drawn from multiple ESP cohorts. More information about the current ESP data release can be found here: http://evs.gs.washington.edu/EVS/ under 'Data Usage and Release'.